Showing posts with label fabric painting/printing. Show all posts

Monday, January 15, 2024

New Work in Progress


Over this long holiday weekend I did some hand stitching on the small fabric painting I've been working on since before Thanksgiving but wasn't feeling motivated to start a new bigger one. 

Sometimes, just like when I don't want to exercise, I have to tell myself to get going anyway, and that's what I did. 

I taped a large square linen embroidery I purchased on eBay to my work table, and instead of printing with the construction fence underneath it to get the pattern of the grid, I taped the fence on top, actually two fences because they are narrow, and I printed the to get the "holes". The two fences don't line up but that will be part of the fun making the design work.

When it's dry, it should keep me busy for a few months.


Sunday, August 2, 2020

Fabric Ready


I've got various stamped drop cloth and monoprinted construction fence pieces of fabric ready to use for a new yet named series. I do have some names I'm considering, one of which is "EEE, and Covid, and Lyme, Oh My!" but I have not figured out how the name will correlate to the imagery. I like the name because it's something I think about everyday this summer now as I go out for a walk, water my garden, and sit by the fire, or just sit, in my backyard.

The detail below is a gem of a find as I gathered the pieces from the stash of fabric in my studio. I have many of these on paper towels but none on fabric. I want to think of something special to do with this random stamping pattern.

Monday, January 9, 2012

Great Find!

The best gifts are the ones totally unexpected, and found when going about your day and when not looking for gifts. That's the case when a friend was clothes shopping recently at Savers, our favorite used clothing store. She found a sleeveless blouse that so reminded her of my work, that she splurged and bought it for me for $3.99.

The two images above are details are of stamped and painted fabric of my Weathered Fences Series, and below is a detail from the blouse fabric. How perfect! Thank you my friend!

Monday, July 11, 2011

Patterns in Nature


I love the leaves of the Imperial Taro in my tiny water garden. I was recently admiring the detail of the pattern, wishing I could replicate it.


Then, while in my studio, I was looking at some fabric I recently monoprinted and painted for my July 12 x 12 x 12 and also the Seasonal Fences - Summer series, and I realized that I can actually make something similar, though not necessarily mirrored like the plant is.


That's unless I take a picture of the pattern and mirror it in photoshop. Hmmm. Lots of lot of possibilities.

Monday, May 16, 2011

Artist Residency - 8 days


Day 8 here on my residency. It's been pouring rain for three days, and the humidity has really slowed the drying time for my work.

Fabric paint that took about 20 minutes to dry last week when it was the most perfect spring weather in 60's/70's and dry and sunny, is taking now over an hour. Last week when I coated 10' x 4' pieces of fabric (two are shown above) with watered down matt medium to stiffen them, it took about 3-4 hours to dry, but today it took over 8 hours. Thankfully I'm finished painting, and tonight I'll coat the last 10' piece of fabric so it can dry overnight.

I'm now cutting holes in the stiffened fabric. I'm hoping to finish cutting the (about) 233 holes in one piece before bedtime tonight. Working large has meant doing obsessive work, which amazes me since I'm not at all an obsessive person.

I'm also really enjoying being around the other artists and writers. The conversation is really interesting, learning about where people come from, what they do with their daily lives, and what they're working on here.

Wednesday, January 12, 2011

January 12 x 12 x 12 in Process

After four years of working on my monthly 12 x 12 x 12 series, I've decided to continue through 2011, but this year working on boards instead of canvas.

Last week, when I started work on my January piece, I decided to use a piece of leftover monoprinted fabric from my new six panel Fall Fence Landscape since I printed enough fabric to create 12 panels.

I stitched the grids of the lines of garden mesh, and then mounted the fabric on a 12" x 12" board. After it was dry, I started painting in the 1/2" x 3/8" rectangles. It was boring, and required a lot of patience, and NPR was my entertainment.


My next step was to attach the acrylic "skin" (below) of a construction fence on top of the painted grid.


And then I coated the whole board with self leveling gel, something I've never worked with before. Interesting stuff. It's white when applied wet, and it turned my whole piece blue-ish after I applied it. I have no idea why, but it will dry clear.

Now I wait as it dries. Normally I'd be rather impatient, but it's drying in my studio, and I'm at home where we got 13"+ of snow overnight.

I look forward to seeing it when I can venture out. There were very interesting tiny bubbles starting to form under the gel, around the stitching, and I wonder if they'll still be there after it's dry.

There are more steps planned after it's dried, which I'll write about soon.

Thursday, July 8, 2010

Working On My July 12 x 12 x 12


This is the front and back side of the fabric I'm using for my July 12 x 12 x 12. It's a monoprinted and painted piece of what used to be my cotton organza living room curtains until the fabric started to disintegrate, and I had to find a replacement.


Yesterday I posted a picture of a piece of cardboard that has some of the white paint from what soaked through the sheer organza on to the cardboard. It was a fun surprise for me.

I've mounted this piece of fabric on to canvas, and I'm almost done with the finishing touches of my July piece. I'll post pictures here on this blog, and on my website, shortly.

Wednesday, July 7, 2010

Drop Cloth Board


I'm working on my July 12 x 12 x 12. This month I decided to use a piece of what used to be my living room curtains, which I loved dearly, but had to retire because they were starting to disintegrate.

They were cotton organza. I'll post pictures and explain more about the curtains shortly, but first, here is a piece of cardboard that I use as a drop cloth of sorts. As I worked on my July piece, I painted the monoprint of a construction fence on the organza. Most of the white paint went right through the sheer fabric and on to the cardboard, which had a lot of leftover paint from past work on it already. The cardboard is approximately 12" x 18", and I've been using it for years and years.

See other drop cloth images, but this this one is fabric. I used it to create twelve pieces in my Traces of Past Fences series. They are mixed media on cradled board, and measure 12" x 9" x .75", and were created earlier in 2010.

I'm wondering if I should retire this card board and save it as an addition to my portfolio. If I save it, it would be my first non-fabric related piece in my portfolio. If you have an opinion about this, please share it with me. I'd love to hear from you. My email address is jeanne@jeannewilliamson.com

Friday, March 5, 2010

Drop Cloth Paintings


I've created 12 paintings in my new series that I think I'm going to name "Traces of Past Fences." They were created from the drop cloth I used for dozens and dozens of pieces I've painted over a number of years. They measure 9" x 12" x .75" and are mixed media cradled board.


The grids of construction fences aren't obvious, but if you look closely, you can see hints of grids by looking at the different handstamped shapes. These pieces are a big change for me, but I think (hope) they fit in with my portfolio.

While these two photos aren't great, I wanted to share what I just finished. I'm going to get each painting photographed individually next week, and I'll post all of them here on my blog, and on my website, shortly after I get the images back from my photographer.

Sunday, February 21, 2010

Drop Cloth


I am considering my options on what to do with my latest drop cloth. It's approx 35"w x 50"h, and I think looks good on both the front (above) and back (below) sides of the fabric. I've actually been trying to decide what to do with it since August, when I posted about it then. (It does have more paint on it now than it did then, though it may not be that obvious.)


I think I don't want to leave it whole. I think I want to stitch it and cut it up in to smaller pieces and mount all of the pieces on cradled boards. I think they'd look very abstract, and should be interesting, if I do say so myself.

I even have name ideas, which for me us unusual. I'm thinking "Traces of Past Fences," or something like that.

The reason I'm hesitant about what to do it because the last time I had a good drop cloth, I totally ruined it.

I'm very interested in hearing thoughts and comments, so please don't hesitate to email me at jeanne@jeannewilliamson.com, or if you're reading this on facebook, you can also leave me a comment on my wall.

Wednesday, February 10, 2010

More Weathered Fence Series - in progress


This is the second piece in my new "Weathered Fence" series, in progress. Below is the first piece, also in progress, so you can see the slight differences.

My plan is to create six in total, with the fence deconstructing a little bit in each one. When finished I will to stiffen the fabric, and then I will cut holes in it in various places so they viewer can see thru it.

You can more about this series in my post on on Feb 2nd.

Tuesday, February 9, 2010

Another New Series in the Works


Ever since I created Orange Construction Fence Series #17/36 in 2005, I've wanted to make more work that incorporated slivers of fences. This is a detail from that piece, which is my inspiration for some additional new pieces I'm working on on cradled board.

I need to think of a name for these pieces, which will be 18" x 18" when completed. Maybe it should be called "Slivers of Fences" or something similar.

Two are almost finished and I'll post them ASAP. My plan is to have a total of six in this size complete before Catherine Carter and I hang our show "Walls and Webs," at the Narrows Center for the Arts in Fall River, MA, the second week of March. I can't say that any or all of these pieces will be hanging in the show, but I want to have them ready, in case there's a place for them on the walls.

Tuesday, February 2, 2010

New Series - in progress


I've started a new series I'm going to call the "Weathered Fence." It's based on how construction fences weather in the elements. This series is influenced from Orange Construction Fence Series #32/71, which is a quilted piece.

The Weathered Fence Series will not be quilted. It's going to be stiffened fabric, that can be exhibited a few inches away from the wall, or as an installation where viewers can walk around it to see both sides, just as one might walk around an actual construction fence.

These pieces are monoprinted, handstamped, handpainted, stitched and stiffened fabric, and I'll be cutting holes out of various parts of the fabric so shadows and pattern can be seen through it.

Above is the front side of the fabric, and below is the back side. Please note this work is not finished yet. I'm posting this is as a work in progress. It's going to be about 35" wide by 48" high, when finished.


This piece was partially stitched when I took the picture. I have to say that sewing only one piece of fabric, instead of two layers plus quilt batting, is so much easier, and also liberating. What took me so long to decide to stop quilting?

A week ago I printed six pieces of fabric that I am planning on using, so there are more to come in this series. More pictures of this piece and others will be posted her on my blog soon. When they are finished, I'll post them on my website.

Sunday, January 24, 2010

Results After a Day of Hard Work


Yesterday I spent the day monoprinting the textures of construction fences on 10 yards of fabric. The picture above partially shows the fabric hanging to dry on pants hangers in my shower.

Some of the fabric will be used for new pieces that represent weathered construction fences, similar to Orange Construction Fence Series #32/71, but there will be NO quilting on these pieces. The fabric will be painted to embellish the printing, lines will be stitched to enhance the lines of the grid, holes will be cut in appropriate places in the fabric, and then the fabric will be stiffened so that it has a construction fence-like feel.

I also plan on creating up to six 18" square pieces mounted on cradled board that take the inspiration behind the ripped fence of Orange Construction Fence Series #17/36 further. No quilting on these either.

What I'll do with the rest of the fabric I'm not sure about yet.

I'm very excited about getting to work on these pieces.

Monday, November 16, 2009

Matt Medium and Fabric Stiffener


I'm experimenting with making some cut construction fence-like pieces and coating them with either the matt medium or fabric stiffener so they're more fence-like. I'm going to be in a two-person show in March, in a HUGE gallery space in an old mill building. I'd like to try making an installation in a corner of the gallery using the construction fence-like pieces so both sides of the fabric can be seen. I have this idea in my head, and I hope I can pull it off. If I'm not happy with the stiffened fabric "fences," I can do it again, but quilt it, cut holes in it, and paint color on the back side so it's not white. I'll keep you posted.

As I'm working on the bigger pieces I'm thinking about, I'm also thinking of having some fun, short term, with the two little samples I made by shooting pictures of them in different locations, as shown above. This one is looking through the fence in a bedroom in my house. I imagine many different fun pictures, similar to those I've seen when people take pictures of their gnomes all over the world. I don't inspire to travel the fabric fences all over the world, but it could be fun to see different backgrounds through the holes.

Below are pictures of my two small experiments after I cut the holes in the fabric and stiffened it. It's impossible to show the different textures on the web, just like it's impossible to taste a recipe on the radio, but here's a quick description ...


This one I coated with Golden Paint's GAC 400: Fabric Stiffener (described below) from the Golden website:
- Dries to a very hard and stiff film.
- Most useful for priming fabrics (cotton, linen, silk, etc.) when stiffness is desired.
- Allows sculpting and shaping of draped fabrics.

I like the stiffness. It puckered a little when coated, and makes a decent fabric fence.


This one I coated with watered down matt medium. The outer texture is nice, but it's rather floppy.

A friend of mine picked up some Paverpol, which is also a fabric stiffener. I need to plan a rendezvous with her to pick it up. Then I'll give it a try and compare it to the other two products. I did read a warning about it online that said not to let any of it go down the drain because it can harm plumbing. When I try if, I'll have to find a different way to wash my brushes and dispose of the water after cleanup.

Friday, September 18, 2009

12 x 12 x 12 September 2009


New work. I finally was able to finish my 12 x 12 x 12 September 2009, in between everything else I've been working on (like web design, sweaters, Open Studios prep, my solo show prep, etc). For this piece I tried the new Golden Liquid Acrylics that I bought a week ago when we left the Red Sox game due to a rain delay and stopped by Dick Blick while on the way home, as I described here.

Because I was short on time, I used two different already printed construction fence fabrics, and put them together while paying attention to the different sized grids. I didn't have a plan. Everything I did was what popped into my mind at the time. I admit I was distracted, and that I felt rushed. This piece is OK. It's not bad or really good.

Hopefully next month, which is going to be even busier than this month, I'll start my 12 x 12 x 12 much earlier so I can play around with it more than I did this month.

If you want to know more about this series, you can read past posts about my 12 x 12 x 12 series here on my blog, or see all of the completed work on my website.

Sunday, August 23, 2009

Drop Cloth


I must use this drop cloth fabric for a new piece sometime. The front/painted side is above, and the back/where the paint soaked through side, is below. Way cool, and totally unplanned.

It's impossible to understand the size by looking at photos. It's about 40" x 50" in size. If I use it, I'm not sure if I'd want to use the front of back side. Something to think about.

If you study it closely, you can see areas of where I stamped +/or painted many pieces from my Orange Construction Fence Series over the years.

Saturday, August 22, 2009

Texture


I'm tempted to try to print off of textured cabbage leaves if we get another cabbage head in our CSA. I'd never seen cabbages like these before until we got them in our CSA for a few weeks at the end of July/beginning of August. I took some pictures of the leaves the last week we were on vacation. I would have tried printing them then but didn't have the right printing supplies with me.


If I do try printing off of it, it won't become the start of the Green Cabbage Series. I'm quite happy working on my Orange Construction Fence Series and my other construction fence related series, but it's funny to think about.

Friday, August 21, 2009

12 x 12 x 12 August 2009


I finished my August 12 x 12 x 12.


I decided to use the wrong side of the printed/painted fabric, and I did a ton of stitching, which you can see in the detail above.

The background printing was through the holes of my new white construction fence, instead of the texture of the fence, like I usually do. The fence is very thick and textured, and it's hard to see the grid of the fence. In other words, it didn't print as well as I had hoped.

You can see the fabric painting in process, on the right side of the fabric, in my August 6th post.

The colors I used were chosen because I wanted to try them before I used them for Orange Construction Fences #71-76, which I started on my recent vacation.

If you want to know more about this series, you can read past posts about my 12 x 12 x 12 series here on my blog, or see all of the completed work on my website.

Wednesday, August 19, 2009

What I Did on My Summer Vacation

This is Show & Tell after my two week summer vacation on Cape Cod. One of the many things I did was paint fabric. Creating art is not "work" for me, even though it is one of my many jobs. While everyone I was staying with went to the beach mid-day, I went down to the basement and painted. I love the beach but not at peak sun, so I had no problem being in a cool basement, doing what I love to do.


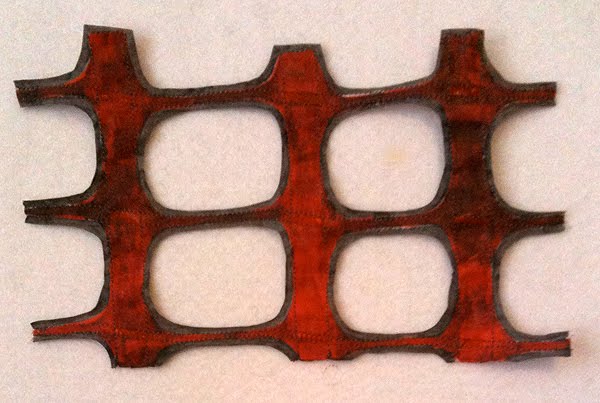
The first piece I worked on was Orange Construction Fence Series #70, which I stamped and handpainted on already monoprinted fabric of a construction fence. There were 18 columns x 20 rows, which = 360 rectangles that I painted grey. B-o-r-i-n-g but necessary. Fence 69 (below) had the same number of grey rectangles, which I had already painted at home. #70 is almost completely painted. The final part will be completed after I stitch it.


Before vacation I had been working on Fence #69 (above), which is also almost completely painted. I didn't add any more paint while on vacation. I did bring it with me so I could use it as a reference for when I was working on #70. Just like #70, there will be a little more paint added after I stitch it. This is the back side of the fabric, which will be the side I have facing out before stitching.


Above is the fabric for my August 12 x 12 x 12 series. I think this picture is better than the one I posted while away, since I have more light in my studio than I did in the basement I was working in.


After the above, I started working on a sub-series, Fences #71-76, which may or may not be exhibited together as a group, in pairs, or separately. This has yet to be determined. The Fence #71 fabric is almost completely painted. It still needs a little more paint in the grid area. This is the back side of the fabric.


The Fence #72 fabric, also almost completely painted. It also needs a little more paint in the grid area. This is the front/painted side of the fabric.


I started running out of vacation time, so I only got to handstamp the Fence #73 fabric. It still needs to be painted.


The same thing for the Fence #74 fabric. It's now handstamped and still needs to be painted. This is the back side of the fabric.

My next steps are, stitch my August 12 x 12 x 12 fabric, stitch and finish painting Fence #69 and #70 ASAP so I can include them in my solo show, finish painting Fences #71 and #72, paint Fences # 73 and #74, then stamp and paint Fences #75 and #76, which I never had any time for while away.

I think I may have some time here and there, in the next few months, to work on #71-76, but quite honestly, I don't see finishing them until after the New Year. I may be wrong, but doubt it. With two websites to design, many sweaters to redesign and/or sew buttons on for Open Studios in mid-October, planning my solo show at the Hunt-Cavanagh Gallery at Providence College which opens on October 26th, two possible two-person shows coming up after that, and quite a few other things I have going on, I think I'm being more realistic than pessimistic. Of course I'll post updates here on my blog.